Please note any mentions of Media Nav on this page refer to the Media Nav Evolution that supports Android Auto and not the older Media Nav units that don't have this function.
When I first started Green Laning in the Duster I used the free Microsoft Bing Maps OS Layer to plan my routes, then I’d gather up all the ‘pins’ coordinates that I’d placed at the start of every lane I wanted to drive (I’d place them at the either end of the lane based upon the direction I wanted to travel) send them to myself in an email in order and manually add each one to my Media Nav that’s a lot of tapping on the screen and adding hundreds of numbers.
This was the worst part of it, I could plan a route in minutes yet spent an hour or more adding them to the Media Nav. This process whilst time consuming was very beneficial as the Media Nav would take me to the start of each lane, then re-calculate at the end of each lane to take me to the next lane and so on…
I then moved to using Memory Maps for Offline OS Map access on my phone for navigating the lanes and planning using the Desktop app but again whilst this was quick I still had to enter all the coordinates into the Media Nav!
The Duster Mark II
After buying my next generation Duster it came with the Media Nav Evolution which I was aware it came with Android Auto but I do like the built in system so didn’t want to try it.
Then came an issue when I planned a mega weekend in Devon with 138 lanes to ‘investigate and drive’ as mentioned previously planning was quick! but I really didn’t want to put in 138 coordinates manually by hand into the Media Nav so I started looking into soloution!
I knew that I could export ‘Routes’ from Memory Maps as a GPX file but how could I get that into the Media Nav? Well I couldn’t but could I use Android Auto?
Android Auto
Android Auto (AA) is a way of displaying apps running on your phone that are designed for AA on the screen of your Media Nav, Whilst its doing that you can run other apps on your phone screen.
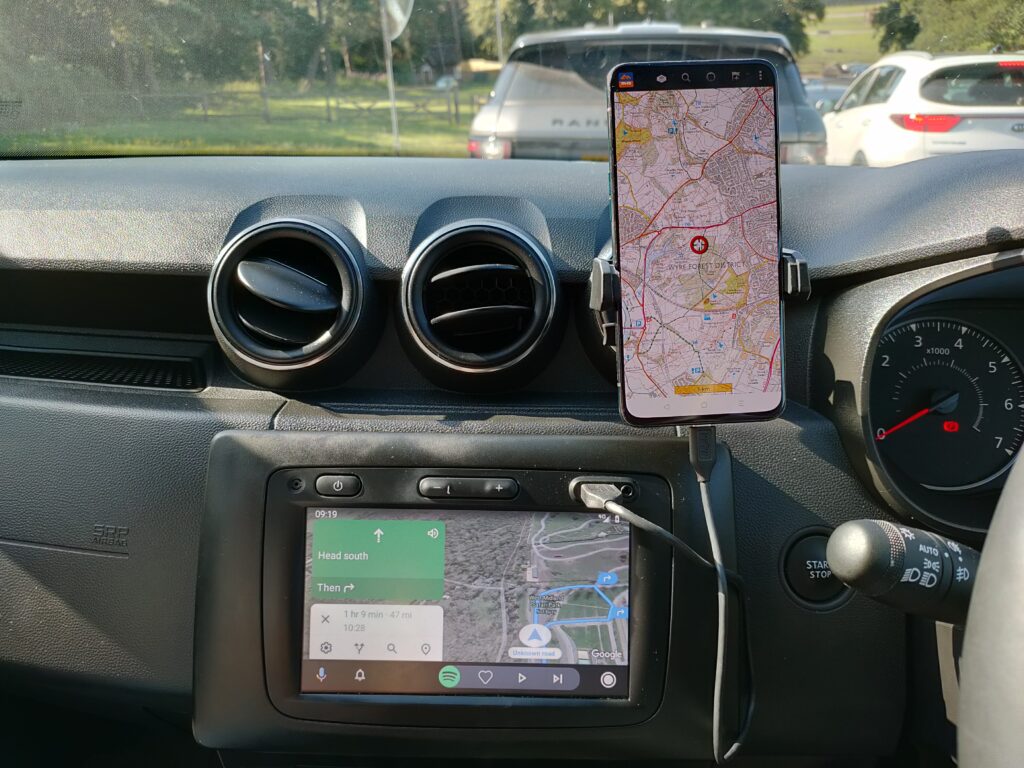
In the Picture above you can see my phone attached to the Media Nav via USB which is the only possible way to get AA to work, You can see that I have Google Maps as the navigation on the Media Nav itself (Which is actually running from the phone, Satellite view can be turned off and areas that your driving can be downloaded in bulk for offline directions before you travel), The phone is displaying the Memory Maps App which as Google Maps doesn’t display ‘Green Lanes’ as such you need pinpoint accuracy when travelling some of these routes and that is provided by the MM app running at the same time.
Planning your trip
So, I use Memory Map on a PC the steps shown here apply to the PC/MAC desktop app, The mobile app can do this too but the desktop software (Which is free, you only pay for the maps/map subscription) to me is an easy and much more convenient way of organising things, adding notes etc etc you can sync these to your mobile app too.
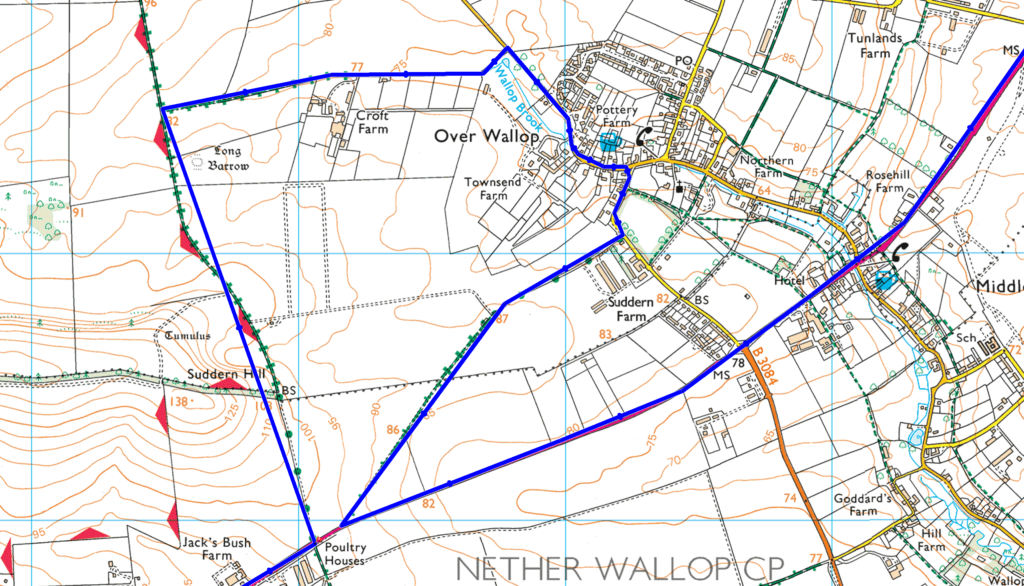
First off, I’ve seen people plan routes that also include every road they are driving for example they create a way point at every junction and and follow that rather like a sat nav as shown in the above picture.
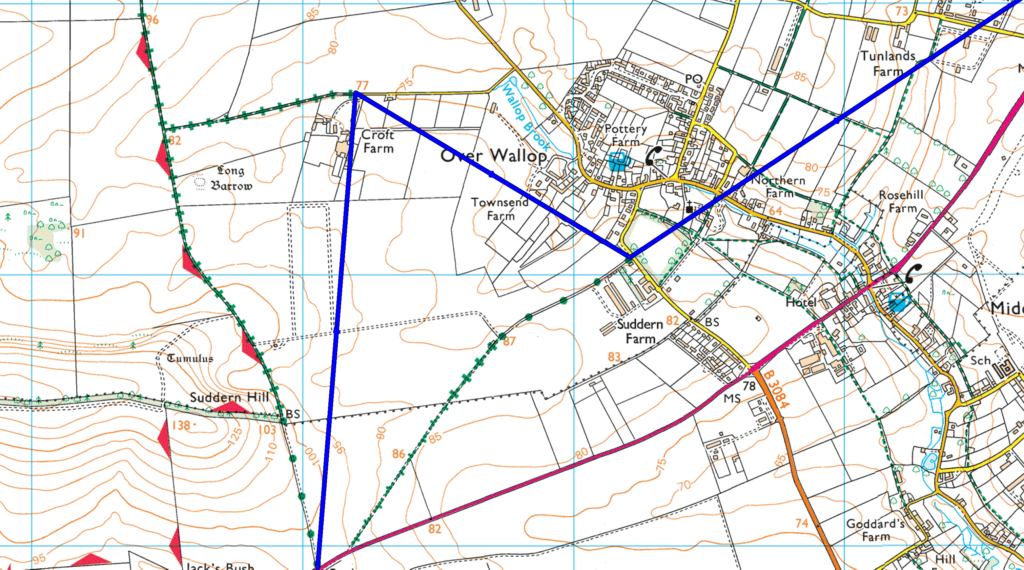
The Image above is how I plan my routes, I don’t need to work out which roads to use because I’ll add them to Google Maps and that’ll guide me the fastest way with the added bonus of traffic alerts! Starting from the lower left corner I’ll head north and drive the complete ‘lane’ once at the end Google Maps will ‘Recalculate’ the route now I’m back on a normal road and send me to the lane at Croft farm, on these particular lanes that re-join lanes I’ve already done, as I’m recording them I’ll still want to make a full video (as opposed to a short video showing the lane that i havent driven) and generally head the shortest direction out in this case that’s south, as the ‘waypoint’ has already cleared off the screen for the southern part of this lane the Satnav will send me up to the top right along the pink road to my next lane, Easy!
Building your routes in Memory Map (Desktop)
So, now we know what I do lets create a quick route. The real benefit to this process is on lanes of 10 or more as Google maps only allows you to have 10 stops maximum including your start and end stop. This is a problem when we want to do 20+ lanes in a day. For this example though I’m showing you a couple of lanes but the way of doing it is the same for 3 lanes or 1,000 lanes!
On Memory Maps once your in your start location click the ‘New Route’ Icon highlighted in the above image.
All you need to do now is click at the start of each lane you want to travel, making sure you click the start of the lane you want to come in on, for example if you want to travel south to north click at the southern start of the lane. Make sure you do NOT click on the lane itself you MUST click on the last piece of road before the lane starts, typically the yellow road this is because your Satnav doesn’t include green lanes and to it your placing a marker in a field etc. which it knows you cant physically drive to and may cause an error.
In the above image you’ll see I’ve only clicked at the start of lanes and not the places where I’m going to exit, Remember your navigating to the lanes once you reach it the Satnav will automatically clear the waypoint and move onto the next one, ignore it as it will re-direct you once you get to the end of the lane. Whilst your on the lane this is where MM’s Mobile App comes into play as it helps you to ensure your following the legal line of the route and thanks to Android Auto you can run that and AA at the same time from one phone.
In some instances you’ll mark the end of a lane and the reason I do that is generally because it stops at a main road and then continues on, I always mark points at the start of lanes I want to drive even if they cross a main road as in some instances I may not want to drive the full length or the next section is a dead end etc this reminds me when i’m out and about that this particular section ahead of me (That I can see on MM Mobile) is on my list or if the Satnav doesn’t clear off my list and is trying to send me elsewhere it means I wanted to go somewhere else before I return to this section.
Don’t be afraid to add in locations to your route that may seem interesting like Viewpoints, Interesting features of the map like steep roads etc etc that you discover when your planning these routes.]
Top Tips:
Use your middle mouse button for moving the map whilst creating your route by clicking and holding down the button to ‘grab’ the map and move it around.
Press the ESC key to exit route planning mode.
Preparing your route for Android Auto
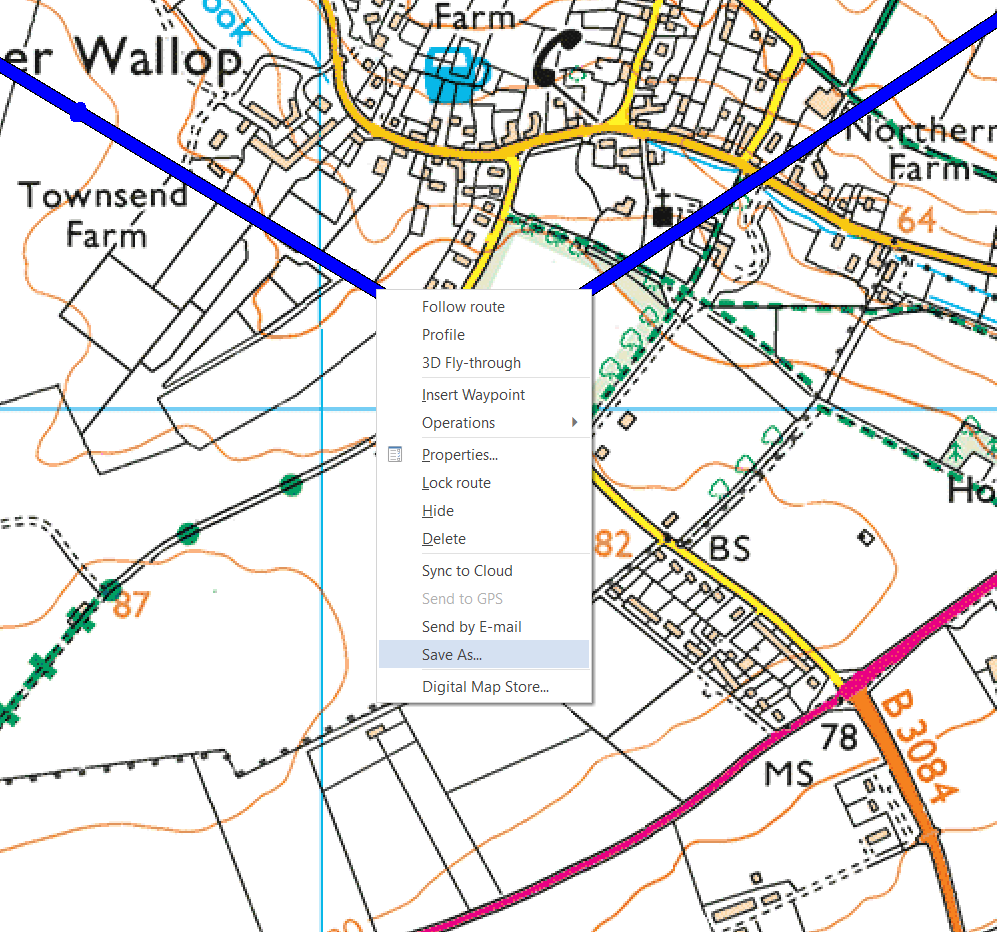
Once you’ve checked your route and your happy with it right click it and select ‘Save As…’ as shown in the image above.
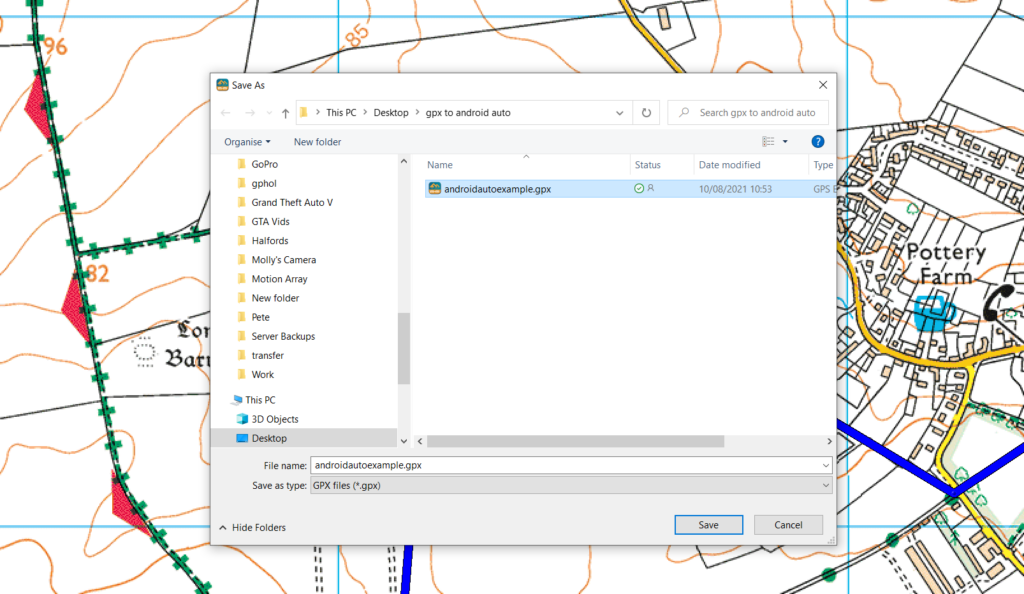
Give it a name and perhaps create a folder to store it in for future use then click save, This will save the files as a GPX file. These can be shared and or used on other mapping and GPS software but for us we need to somehow get that into Google Maps running Android Auto and this is the complicated bit! Well, ok it’s not that complex once you’ve done it the first time.
Searching for an easy solution
Top Tip: This section is about how I came to the conversion solution, to continue the process move to the next section if it doesn’t interest you.
When I was trying to find solutions for saving myself the time of having to input hundreds of coordinates into the Media Nav I looked into the Android Auto feature but needed something I could either copy and paste the coordinates into (they are able to be taken from the GPX file but that’s complex so I’ll explain another time!) and get the Satnav to navigate to them. The only mapping systems really for AA where Waze and Google Maps so I concentrated on Google Maps.
I first thought, I know what, I’ll add them as stops on my PC on Google Maps then share the route so I can load it up on my phone then I came across a problem and found that you can only add 10 stops to Google Maps. Tragedy! I had 138 stops! So I did a little research and found that using a ‘hack’ you can actually add more than ten stops by adding them into the URL but again this was limited to I think 25 stops and then came the processing of the GPX and getting all the coordinates out, Whilst time consuming this would be a little easier than tapping the screen of the Medinav for 2 hours! So in search I checked to see if there was a Notepad++ plugin to process the GPX and strip out all the junk and leave me with just the Coordinates (You don’t need to understand anything I’m saying here but its just how it happened!). Strangely as I searched it led me to this a website that converted gpx files to Google maps links and that’s the secret key that makes this process easy!
The Conversion
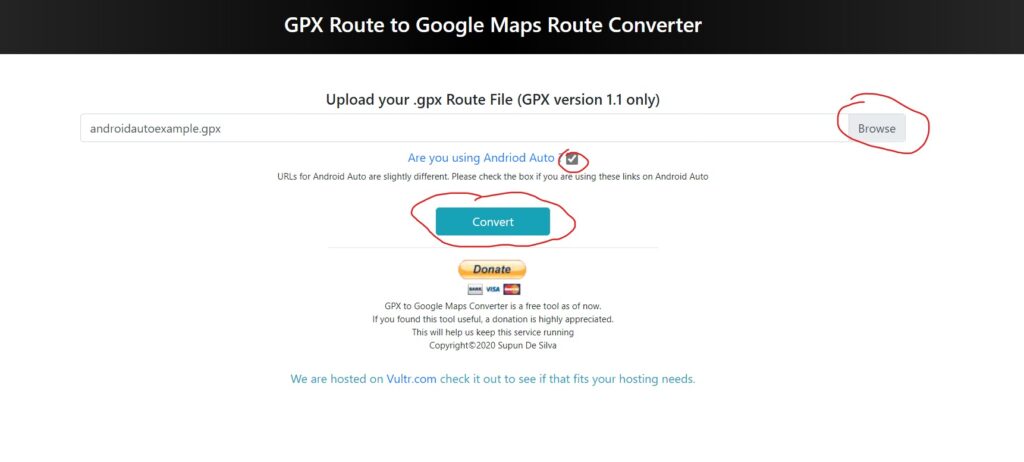
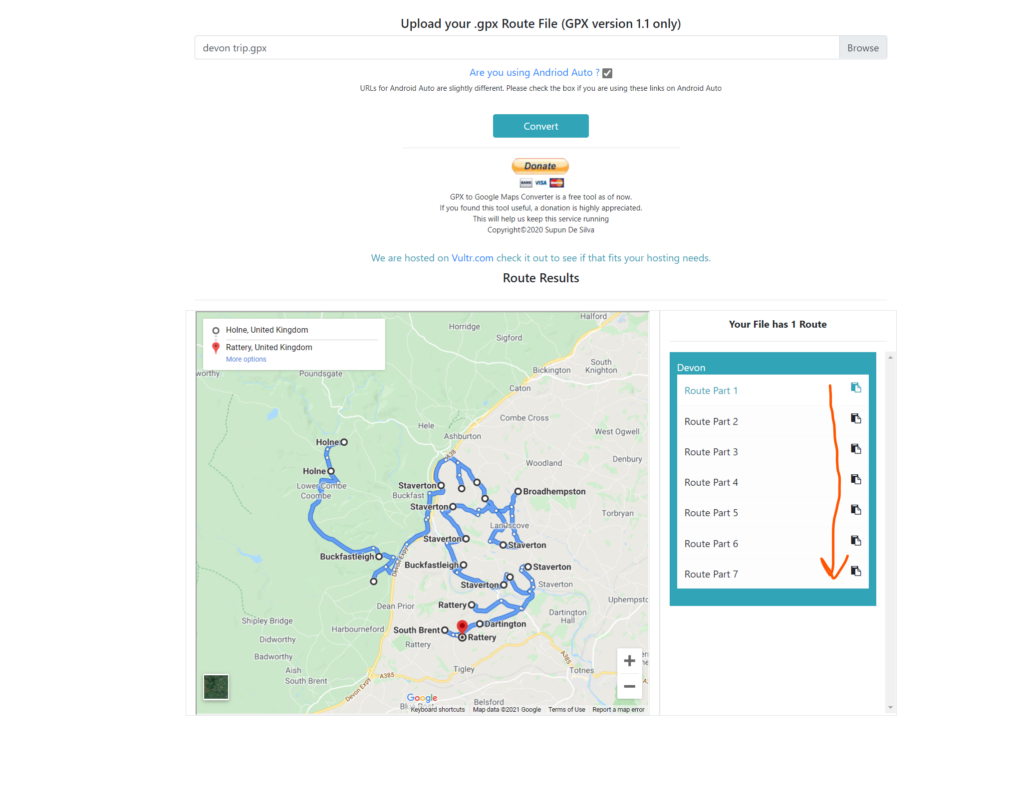
Open https://www.daciadusterexplorers.co.uk/gpx2gmap/ in your chosen browser (or click the link) you will see the above image, Check the box that says ‘Are you using Android Auto?’ this was added by the website owner by request by myself because without this extra step the route wont start in AA because when you start normal route planning in Google Maps you can set a start point for planning but in our case your not planning the route needs to start at your current cars location when you start the route and without this checked it will just fail.
Click the Browse dialog and locate your GPX file FYI you can also drag and drop the file into the filename box, once done click the button labelled ‘Convert’
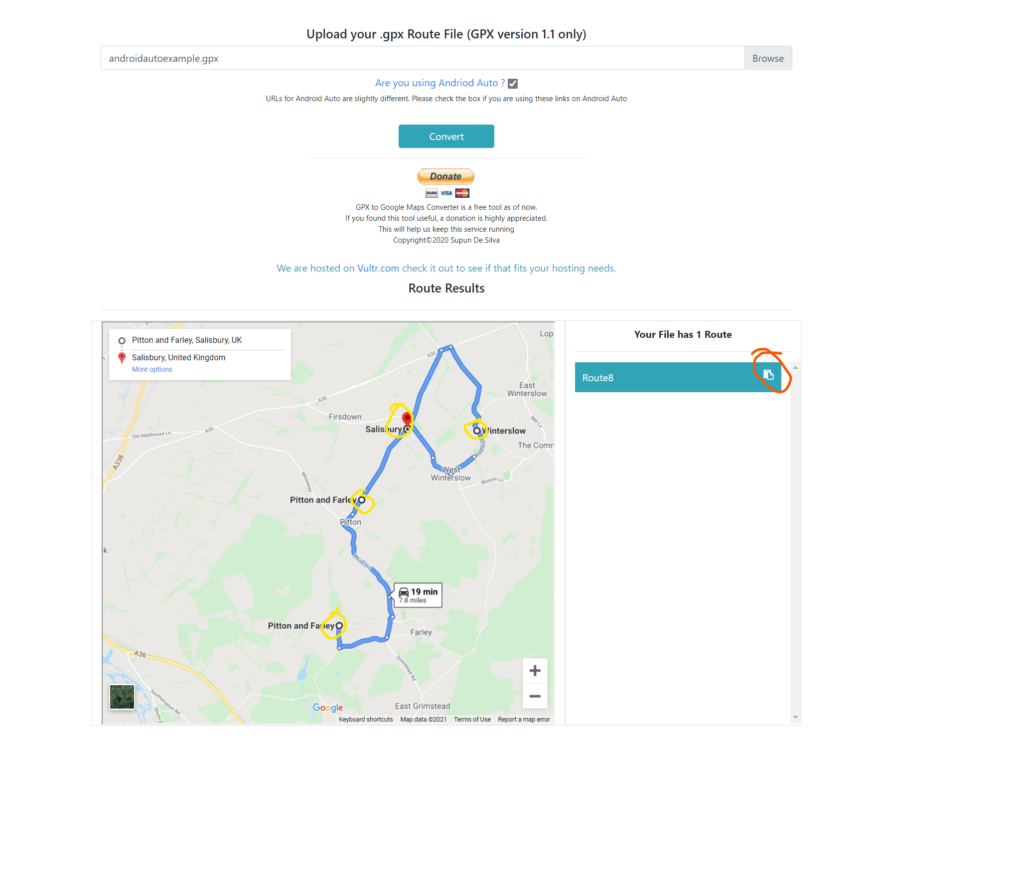
Once Converted you’ll see the screen (shown above), It’s labelled as Route 8 that’s just the name it was inside of my MM, You’ll see the 4 points that we want to navigate to circled in yellow as you can see Google Maps has navigated us to each of these 4 stops but when it’s transferred it’s dynamic so when out driving these roads and directions will change once we get to the end of each lane and depending on traffic/closure settings etc.
The fastest way to get this to your mobile is first click the copy to clipboard icon (Circled orange in the image above) then open up your emails and write yourself an email ‘pasting’ (Right click on your emails ‘body’ and a little menu will pop up with the option to paste) the link into it, then when your ready send it to yourself if you receive emails on your phone you’ll now have the link that this website has created ready for AA on your mobile, where it needs to be.
Now all we need to do is get that from your Mobile into Android Auto on to your Media Nav! and here’s how.
Sending your Route to Android Auto
Connect your phone to the Media Nav’s USB port, Your phone may ask what you want to do with the USB connection, It’s ok just to have it as ‘USB Charge’.
On your Media Nav Screen in the lower right you’ll see Android Auto as an option, select it and then find the ‘Maps’ option.
As you will now see you’ll have Google Maps in Driving mode
So how do we load up your Memory Map route? Well there’s a problem. If you click on the link in your emails on your phone (whilst connected to the Media Nav) the end of your route will appear on Google Maps on the Media Nav but not your stops. Rubbish aye? I don’t know if it’s a bug or not but there is a solution!
Disconnect your phone,
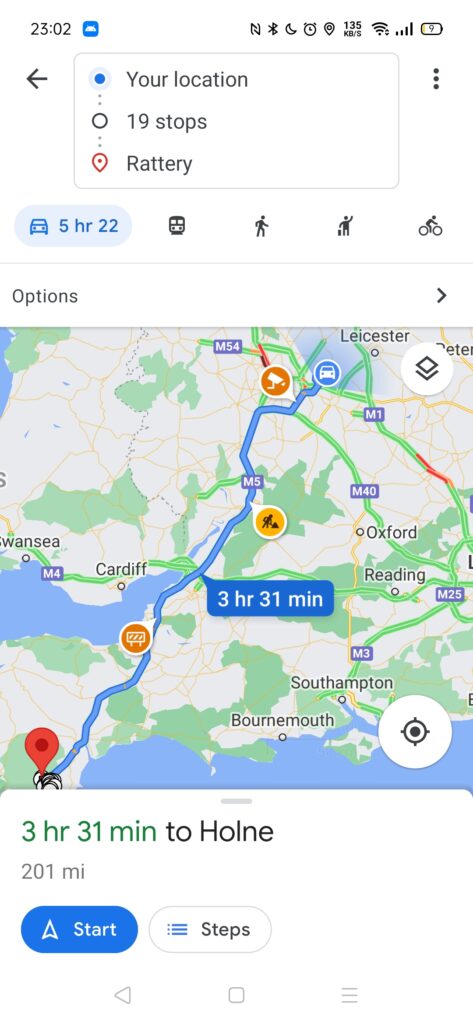
Now open that link and you’ll see the Google Maps app open and all your stops are there! Start the directions by clicking Start as shown in the above image.
Re-connect your phone and Click ‘Android Auto’ on the Media Nav you’ll now see that your route has been transferred with all your stops! All you’ve got to do is drive. Once at your first lane fire up the Memory Maps app on your phone whilst keeping connected to the Media Nav, Your Google maps may loose were you are as it may not detect you are on a road but using MM you can navigate the route safely, once back at a road Google Maps will re-direct you to your next lane, rinse and repeat the process until your finished!
Top Tip: When you exit a lane and you have a choice left or right sometimes the Satnav will pre-navigate based on where it thinks your car is heading, this may actually be a longer route. If you think this has happened zoom out of the map with your fingers like you do on your phone using the Media Nav screen and look to see if your next stop is in the direction your going, if you can’t quite work it out look at the ‘time’ to your next stop, if it says say 15 mins and your not sure because you think it should be 10, if its safe to do so reverse (The satnav will think your driving the other way) or turn the car around and head in the opposite direction if it shows that it is quicker to be going that way then continue, if its longer turn back around and continue to your next stop.
Route size limitations
I did this process to save time on 138 lanes I wanted to visit over a weekend, The example above shows you for 4 lanes, this really comes into its own on big routes.
The process is virtually the same.
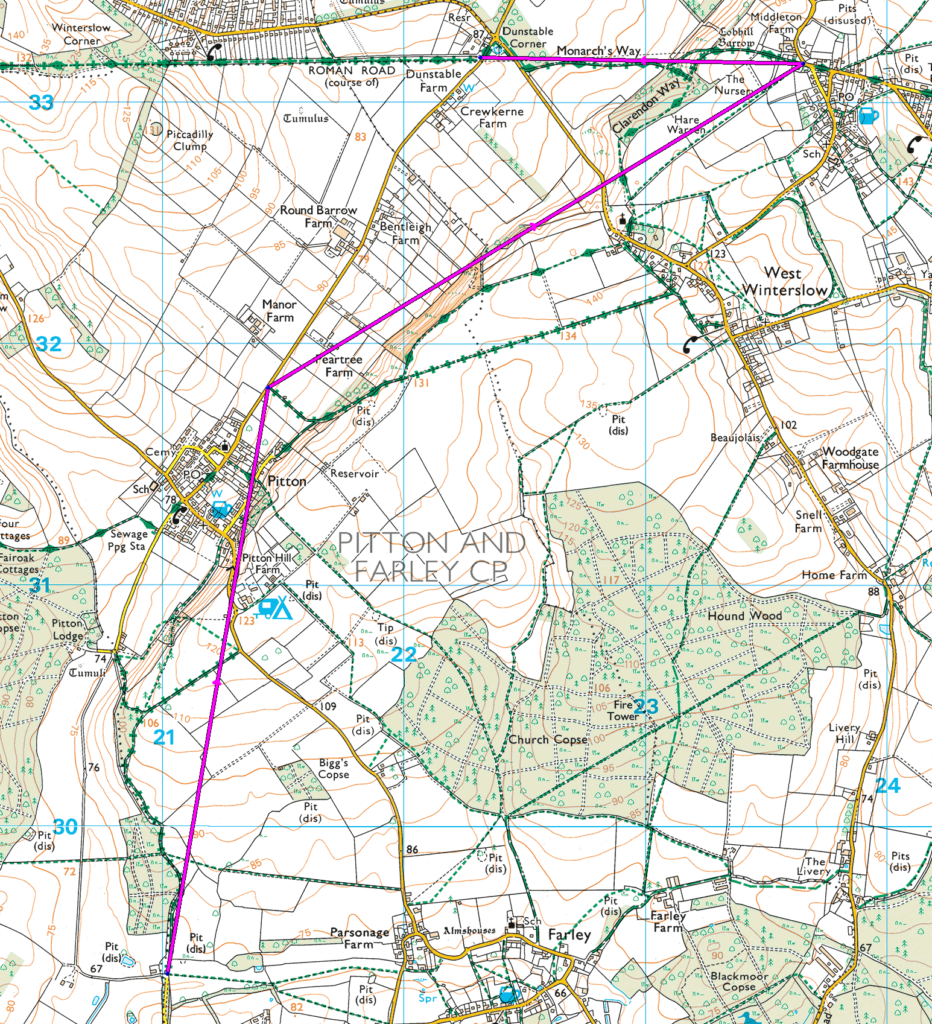
Shown in the above image is a more complex GPX converted, but due to a limitation in Google Maps it can only do about 25 stops per link. all you need to do is copy and paste the links working your way down into an email in order.
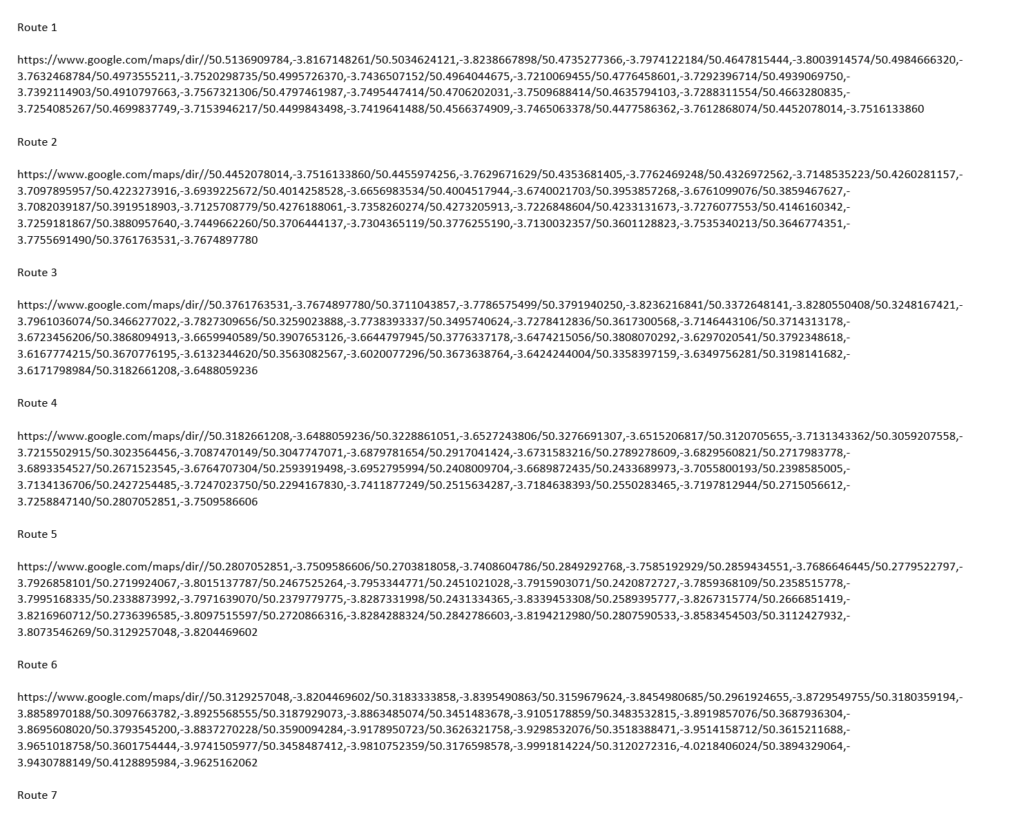
In the Image above you can see how I’ve formatted my email to remind me at what stage I’m at by adding ‘Route 1’ etc. above the links. Once you’ve completed the process for starting the 1st Route (These are all created from just 1 GPX route file from MM) drive until you reach your final destination once you’ve finished that lane re-do the process but clicking the Route 2 list to continue and so on until you’ve completed your trip! Bear in mind that the disconnecting of the phone to start the links applies to every route so once you reach and end of the first ‘section’ as it were, disconnect the phone, click the link, start the directions.
PLEASE NOTE THAT SOME EMAIL PROVIDERS CHANGE THE URL AND AS SUCH THE ABOVE STEP IS BROKEN USING OUTLOOK, I NOW USE MICROSOFT STICKY NOTES WAS I CAN CREATE A NOTE ON THE PC AND IT’LL SYNC TO MY PHONE WITHOUT CHANGING THE URLS
I hope you found this helpful and if you have any questions simply use the messenger option on the website or email enquiries@daciadusterexplorers.co.uk
Written by: Explorer Adam